Maroon Mauve Gold Glitter Short Press On Nails (24PCS) - Pink & Nude Multicolor Set
Maroon Mauve Gold Glitter Short Press On Nails (24PCS) - Pink & Nude Multicolor Set
Couldn't load pickup availability
Maroon Mauve Gold Glitter Short Press On Nails (24PCS) - Pink & Nude Multicolor Set.
The Everyday Essential: Short Press On Nails Multicolor Set
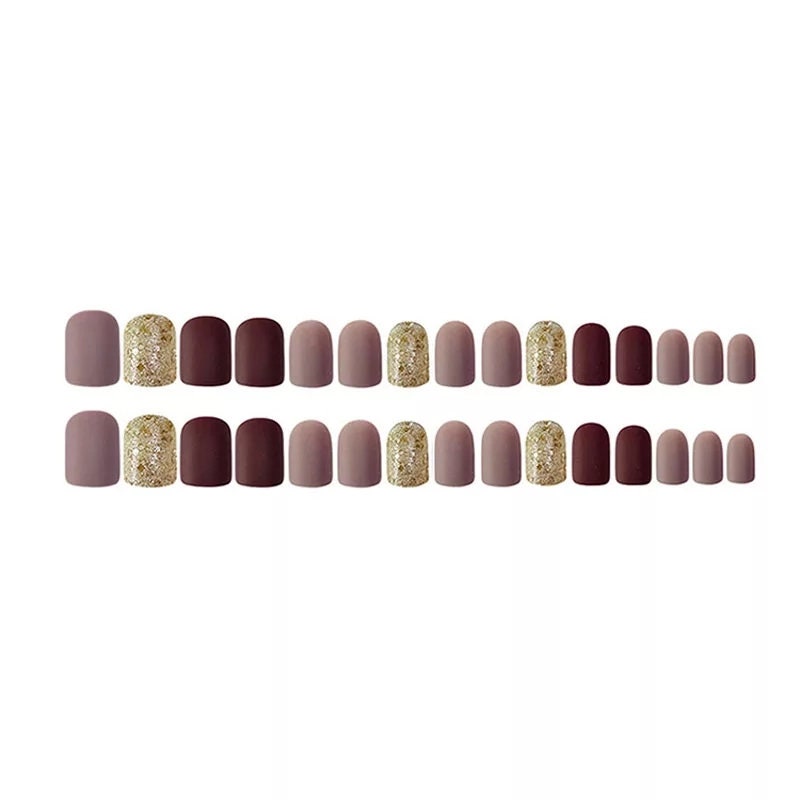
✨ Perfect Variety: Your Maroon, Mauve, Gold Glitter, Pink & Nude Kit
Searching for a practical manicure that doesn't sacrifice style? Our Short Press On Nails Multicolor set is the answer! This incredible kit gives you instant variety with five beautifully curated shades: deep Maroon, soft Mauve, shimmering Gold Glitter, classic Pink, and versatile Nude. Because they are Short Press On Nails, they are incredibly easy to wear for everyday tasks. You get that expensive, flawless finish, but you did the whole look yourself!
Great News! 🚚 We are thrilled to offer FREE 3-5 day shipping on all orders over $10!
🎁 Ultimate Convenience: EVERYTHING YOU NEED DIY NAIL KIT
It's time to stop the never-ending cycle of salon appointments and bills. Smart beauty means being in control of your time and your budget! This ultra-comprehensive kit is built around the smart DIY trend, guaranteeing significant savings while still achieving a perfect, high-glam finish.
What you'll find inside your complete kit:
-
24 Sizing Nails (Sizes 0-9): A full selection is included, which means you are absolutely guaranteed a custom fit for every single finger.
-
The Application Essentials: We provide a file, strong liquid glue, AND reliable sticky pads. You decide your wear time: temporary style flash or durable, long-lasting results!
-
Glue Tip: Opening the glue is easy! Just use a sharp pin to puncture the center of the tip, or carefully snip the very end with scissors.
💡 Why Short Press On Nails Are a Game Changer
Choosing these modern Short Press On Nails offers serious benefits over harsh, old-school acrylics, which is why they are so popular:
-
Practical Length: The short size is perfect for people who type, work with their hands, or just prefer a low-maintenance, comfortable fit.
-
Budget-Friendly Brilliance: Why fork over hundreds? Our affordable sets (typically $9 to $30 per set) deliver the polished look of a professional manicure without the huge financial hit.
-
Protection First: Removal is far gentler and quicker than taking off harsh acrylics, offering crucial protection for your natural nail beds.
-
Instant Variety: The low cost and easy application mean you can effortlessly swap out this Maroon Mauve Gold Glitter Pink Nude look whenever your style demands a change!
✅ Your Flawless 5-Step Application Guide
For the best, longest-lasting wear, a little careful nail preparation is key. Every tool you need is already here in your kit:
-
Map Out Your Set: Take out all 24 pieces and accurately determine the perfect size for each of your fingers. Lay them out for easy access.
-
Customize the Fit: If needed, use the included buffer to gently file any edges or adjust the length to secure the perfect fit you're looking for.
-
Cleanse & Prep: Give your hands a thorough wash, then dry them completely. Gently push back your cuticles and clean up any loose skin.
-
Maximize Grip: This step is essential! Lightly buff the entire surface of your natural nail. This creates a slightly coarse texture that ensures the glue holds securely for days.
-
Seal the Deal: Apply glue to both the back of the press-on and your natural nail. Place the nail precisely and press down firmly for 30 to 60 seconds. We recommend starting with your pinkie and working toward the thumb for the smoothest result.
To Remove Safely: Soak your nails in warm, soapy water for about 10 minutes (wait until the glue feels loose and ready to budge), then gently lift them off. (A tiny splash of acetone in the water can help dissolve the adhesive even faster.)
A final important note: Please make absolutely sure your shipping address is correct when you place your order, as the buyer is fully responsible for providing accurate delivery details.
Share